| Author |
Message |
CiderGuy
Samba Member
Joined: December 23, 2013
Posts: 1351
Location: Bucks County, Pa

|
 Posted: Sat Mar 08, 2014 5:50 pm Post subject: Posted: Sat Mar 08, 2014 5:50 pm Post subject: |
 |
|
| You do fantastic work. I hope you get some por 15 on all that metal before it begins to rust. |
|
| Back to top |
|
 |
kman
Samba Member

Joined: November 04, 2005
Posts: 739
Location: Michigan
|
| Posted: Sat Mar 08, 2014 6:04 pm Post subject: |
|
|
| CiderGuy wrote: |
| You do fantastic work. I hope you get some por 15 on all that metal before it begins to rust. |
Thanks. I will be resanding right before epoxy. I want to get it where I can shoot it all at once. i've been brushing it on inside surfaces where I can't get to later. |
|
| Back to top |
|
|
kman
Samba Member
Joined: November 04, 2005
Posts: 739
Location: Michigan
|
| Posted: Mon Mar 10, 2014 11:01 am Post subject: |
|
|
Some stuff tacked in. I'll finish it up after I take the body back off.
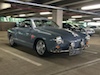
Here is the eventual plan. Maybe a slightly brighter blue than this.
Last edited by kman on Fri Apr 27, 2018 4:41 pm; edited 1 time in total |
|
| Back to top |
|
|
kman
Samba Member
Joined: November 04, 2005
Posts: 739
Location: Michigan
|
| Posted: Mon Mar 10, 2014 11:16 am Post subject: |
|
|
Here's another scary before shot.
Last edited by kman on Fri Apr 27, 2018 5:00 pm; edited 1 time in total |
|
| Back to top |
|
|
kman
Samba Member
Joined: November 04, 2005
Posts: 739
Location: Michigan
|
| Posted: Tue Mar 11, 2014 12:23 pm Post subject: |
|
|
My new favorite template material is 30# roofing felt, which I just happened to have a roll of. Folds bends and is durable.
I tried to bring out the camera a couple of times to show a progression. Once I get hammering I'm kind of on a mission so in progress pics tend not to happen.
the red paint is because I'm welding it on after I take the chassis off again and I want something to line it up with. I still have to make a y pipe. one is OK so I'll copy that. So far old carpet I have lines up with the holes, etc.
I still have to do something about the carpet tabs on these.
Last edited by kman on Fri Apr 27, 2018 5:07 pm; edited 2 times in total |
|
| Back to top |
|
|
kman
Samba Member
Joined: November 04, 2005
Posts: 739
Location: Michigan
|
| Posted: Thu Mar 20, 2014 3:56 pm Post subject: |
|
|
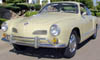
Found a picture of the car from almost 9 years ago.
This part/patch was a lot of guesswork. It seems to fit.
Waiting on a used y-pipe. After I get it the rest should go together OK.
A couple more problem areas. I'm not going to go crazy here. Just patch it up. I was joking yesterday that I should call the car Patches. Unfortunately that personalized plate is taken in Michigan.
Last edited by kman on Fri Apr 27, 2018 5:25 pm; edited 2 times in total |
|
| Back to top |
|
|
carl4x4
Samba Member
Joined: March 20, 2012
Posts: 679
Location: United Kingdom
|
| Posted: Fri Mar 21, 2014 6:30 am Post subject: |
|
|
Good to see the body and floorpan connected back together, I think our cars must have had similar lives as mine went in a similar place in the front fresh air box sections! I must say I'm impressed by the section below the rear seat that you re-constructed that looks like it must have taken a while.
_________________
1969 UK Karmann Ghia build http://www.thesamba.com/vw/forum/viewtopic.php?t=518789&highlight= |
|
| Back to top |
|
|
kman
Samba Member
Joined: November 04, 2005
Posts: 739
Location: Michigan
|
| Posted: Fri Mar 21, 2014 8:20 am Post subject: |
|
|
| carl4x4 wrote: |
| Good to see the body and floorpan connected back together, I think our cars must have had similar lives as mine went in a similar place in the front fresh air box sections! I must say I'm impressed by the section below the rear seat that you re-constructed that looks like it must have taken a while. |
Likely. The mice made their home in that vent. That didn't do it any favors. When sanding on that rust it still smells. I don't know it's history. Probably was pulled out of a salt marsh. I wish I could have kept the body on the pan. They have parted ways. Much to do before they see each other again. |
|
| Back to top |
|
|
kman
Samba Member
Joined: November 04, 2005
Posts: 739
Location: Michigan
|
| Posted: Fri Mar 21, 2014 2:29 pm Post subject: |
|
|
I tried to take my time with this one. Sometimes I'm not very patient.
Last edited by kman on Fri Apr 27, 2018 5:21 pm; edited 1 time in total |
|
| Back to top |
|
|
CiderGuy
Samba Member
Joined: December 23, 2013
Posts: 1351
Location: Bucks County, Pa
|
| Posted: Fri Mar 21, 2014 3:07 pm Post subject: |
|
|
| kman wrote: |
I tried to take my time with this one. Sometimes I'm not very patient.
|
Did you buy the replacement panels used here, or did you make them? Nice work. |
|
| Back to top |
|
|
kman
Samba Member
Joined: November 04, 2005
Posts: 739
Location: Michigan
|
| Posted: Fri Mar 21, 2014 3:30 pm Post subject: |
|
|
| Made them. Thanks. |
|
| Back to top |
|
|
kman
Samba Member
Joined: November 04, 2005
Posts: 739
Location: Michigan
|
| Posted: Thu Mar 27, 2014 10:25 am Post subject: |
|
|
Y-pipes kick panels and seat supports installed.
Last edited by kman on Fri Apr 27, 2018 5:30 pm; edited 1 time in total |
|
| Back to top |
|
|
kman
Samba Member
Joined: November 04, 2005
Posts: 739
Location: Michigan
|
| Posted: Wed Apr 02, 2014 12:49 pm Post subject: |
|
|
"Patches" earning it's nickname.
Not great but close enough
Trying out some Metal Ready. I like it OK. Going to do a bit of sandblasting in a few areas and some more working the metal and sanding. but it is close to being ready for epoxy then filler, primer, paint. Things are picking up.
Last edited by kman on Fri Apr 27, 2018 5:35 pm; edited 2 times in total |
|
| Back to top |
|
|
kman
Samba Member
Joined: November 04, 2005
Posts: 739
Location: Michigan
|
| Posted: Fri Apr 25, 2014 9:20 am Post subject: |
|
|
Days and days of blasting, blowing, sanding, grinding, scuffing, smashing fingers, stabbing fingers on numerous metals clips, scuffing, blowing, sanding, blowing, cleaning, cleaning, cleaning, metal ready, cleaning
and I have this.
Then a 12 hour day of painting in less than ideal conditions.
3/4 gallon of Epoxy
3 tubes of seam sealer and 2 quarts of paintable rock guard for chip protection and sound deadening.
Finally color. It got dark and cold when I did this. I'm going to have to redo some of the trunk, but I expected this. Was blowing dust everywhere (dried paint particles) by the end. I couldn't see much. Spray and pray.
I saved an easter egg for the next person to take out the rear seat. This is very abbreviated writing for Zitrongelb or German for Lemon Yellow.
So now it's ready for filler. It should all be less than an 1/8" thick. No metal finishing here. Maybe if I ever do a Duesenberg .
Last edited by kman on Fri Apr 27, 2018 5:43 pm; edited 1 time in total |
|
| Back to top |
|
|
ScottDoonan
Samba Member

Joined: August 04, 2005
Posts: 546
Location: Northern California
|
| Posted: Fri Apr 25, 2014 10:44 am Post subject: |
|
|
Looking good. Keep up the great work.
_________________
If you take time to do it, do it right and don't be so damn cheap.....🤙🏻
1959 Karmann Ghia Cabriolet (current restoration)
1965 Porsche 356 SC coupe
1967 Volkswagen Convertible Beetle
1969 Porsche 911E Targa 3.2 twin plug
2006 Porsche 987 Rüf 3400K Prototype #2 of 2 |
|
| Back to top |
|
|
carl4x4
Samba Member
Joined: March 20, 2012
Posts: 679
Location: United Kingdom
|
| Posted: Fri Apr 25, 2014 2:27 pm Post subject: |
|
|
It's looking great, definitely worth the time on the seam-sealer. especially around the rear shock mounts as there's some double-skin parts there that are water traps. Looks like you've covered them all nicely 
_________________
1969 UK Karmann Ghia build http://www.thesamba.com/vw/forum/viewtopic.php?t=518789&highlight= |
|
| Back to top |
|
|
ScottDoonan
Samba Member
Joined: August 04, 2005
Posts: 546
Location: Northern California
|
| Posted: Sat Apr 26, 2014 1:10 pm Post subject: |
|
|
Love the 30# roof felt for template material. Excellent idea, gonna try it today on some parts. Thanks for that tip.
_________________
If you take time to do it, do it right and don't be so damn cheap.....🤙🏻
1959 Karmann Ghia Cabriolet (current restoration)
1965 Porsche 356 SC coupe
1967 Volkswagen Convertible Beetle
1969 Porsche 911E Targa 3.2 twin plug
2006 Porsche 987 Rüf 3400K Prototype #2 of 2 |
|
| Back to top |
|
|
KGCoupe
Samba Member
Joined: July 01, 2005
Posts: 3580
Location: Putting the "ill" and "annoy" in Illinois
|
| Posted: Sun Apr 27, 2014 8:15 am Post subject: |
|
|
| kman wrote: |
...
A couple more problem areas. I'm not going to go crazy here. Just patch it up. I was joking yesterday that I should call the car Patches. Unfortunately that personalized plate is taken in Michigan.
... |
Have you considered alternate spellings such as "PATCHEZ", or just shortening it to "PATCH"? |
|
| Back to top |
|
|
kman
Samba Member
Joined: November 04, 2005
Posts: 739
Location: Michigan
|
| Posted: Sun Apr 27, 2014 3:07 pm Post subject: |
|
|
| KGCoupe wrote: |
| kman wrote: |
...
A couple more problem areas. I'm not going to go crazy here. Just patch it up. I was joking yesterday that I should call the car Patches. Unfortunately that personalized plate is taken in Michigan.
... |
Have you considered alternate spellings such as "PATCHEZ", or just shortening it to "PATCH"? |
Just checked. All taken. So was PATCHE5. Personalized plates have a yearly fee here so maybe we'll just get a normal one anyway. |
|
| Back to top |
|
|
bobnorman
Samba Newfoundlander

Joined: August 09, 2010
Posts: 1393
Location: Newfoundland
|
|
| Back to top |
|
|
|


